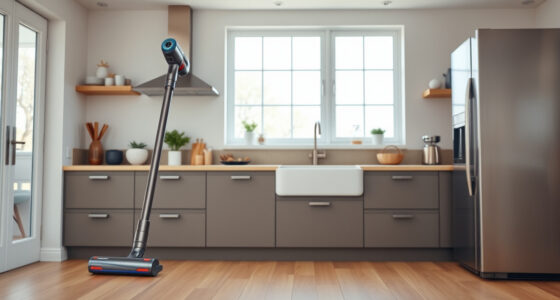
Use this guide to select a cordless stick vacuum that suits your floors, assemble and charge it, clean your home, and care for the bin, filters, and brush roll. It is for beginners comparing or using a household cordless vacuum. Setup and a first cleaning session usually take 20-40 minutes; routine upkeep takes about 5-15 minutes.

Get cleaning gear delivered free with Prime
- Fast, free delivery on millions of items
- Prime Video, Amazon Music and more included
- Member-only deals all year

X100 Cordless Stick Vacuum Cleaner, 650W, 60 kPa, Up to 70-Minute Runtime
- ✔ Motor: 650W brushless
- ✔ Maximum suction: 60,000 Pa
- ✔ Runtime: Up to 70 minutes on low suction; no-load test condition stated
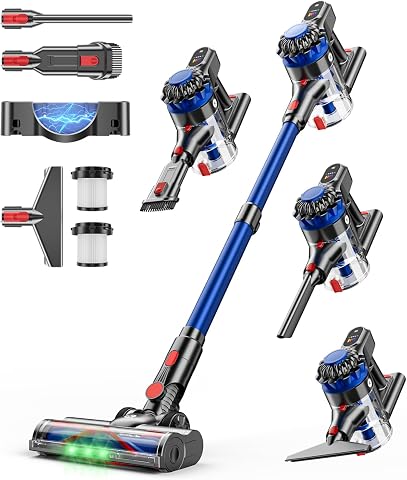
KARDV Cordless Stick Vacuum Cleaner, 500W, 40 kPa, 60-Minute Runtime
- ✔ Motor power: 500W
- ✔ Maximum suction: 40 kPa
- ✔ Runtime: Up to 60 minutes in minimum mode; 20–25 minutes in maximum mode

Emfatix VC7211 Cordless Stick Vacuum Cleaner
- ✔ Model: VC7211
- ✔ Wattage: 350W
- ✔ Battery voltage: 28.8V
Difficulty: Beginner | Time: 20-40 minutes for setup and first use; 5-15 minutes for routine maintenance
What You’ll Need
Tools & Materials:
- Cordless stick vacuum with its charger and included attachments
- Manufacturer’s manual
- Scissors or a seam ripper for cutting hair from the brush roll
- Soft brush or dry cloth for filter and dust-bin care
Knowledge:
- Basic ability to assemble a household appliance and use its controls
- Ability to identify the floor types and cleaning needs in your home
Check the manual for assembly, charging, filter washing, and floor compatibility. These details vary by model. Keep packaging and manuals until you confirm that the vacuum charges and runs. Do not wash a filter unless the manual says it is washable.
X100 Cordless Stick Vacuum Cleaner, 650W, 60 kPa, Up to 70-Minute Runtime
The X100 is the strongest all-rounder in this comparison on paper. Its listed 60,000 Pa maximum suction, three settings and 1.8-liter dust cup give us more flexibility for switching between quick hard-floor passes and more demanding carpet cleaning. The bin is larger than KARDV’s 1.5 liters and well ahead of Emfatix’s 0.8 liters, which can mean fewer interruptions to empty it during a bigger clean.Its self-standing design is a practical difference: we can pause to move furniture or clear a room without leaning the vacuum against a wall. The touch screen also reports battery life and dust cup fullness, helping us see when to adjust settings or empty the bin. The V-shaped brush and guide comb are intended to limit hair tangling, much like KARDV’s anti-tangle roller, although the descriptions do not establish how either performs in real homes.We should read the 70-minute runtime carefully: it is specified for low suction under no-load test conditions, so stronger settings and actual floor conditions can reduce it. The vacuum also calls for regular cleaning of the filter, tube and roller. Choose it for its capacity and controls; skip it if you want a lighter, simpler machine with fewer components to maintain.
Pros:
- Largest stated dust cup in this group at 1.8 liters
- Three suction settings and a touch screen for controls and status
- Self-standing design makes pauses more convenient
- V-shaped brush with guide comb is designed to reduce hair tangling
Cons:
- The 70-minute figure applies to low suction under no-load test conditions
- Filter, tube and brush roller need regular cleaning
- Charging instructions specify the original adapter and removing the cable before use
Best for: Households that want a larger dust cup, multiple suction settings and a vacuum that can stand upright during cleaning breaks.
Not ideal for: Buyers who need a verified long runtime at maximum suction or want the lightest, simplest option with minimal upkeep.
Bottom line: The X100 is the best-balanced choice here if we value capacity, adjustable cleaning and pause-friendly design more than simple upkeep.
“The X100 is the best-balanced choice here if we value capacity, adjustable cleaning and pause-friendly design more than simple upkeep.”
KARDV Cordless Stick Vacuum Cleaner, 500W, 40 kPa, 60-Minute Runtime
At a stated 5 pounds, KARDV is the easiest fit in this lineup for buyers who want a lighter vacuum to carry between rooms or use above the floor. That weight is notably below Emfatix’s listed 7.9 pounds, while the eight-in-one accessory set makes KARDV the more clearly equipped choice for furniture, corners and handheld jobs. Its removable battery can also be useful if we prefer to charge the battery separately from the vacuum.For floors, KARDV pairs a V-shaped anti-tangle roller with green LED lighting. The light is intended to reveal debris under furniture, a useful complement to the X100’s screen-based status features. Its 1.5-liter cup is respectable, though smaller than the X100’s and nearly twice Emfatix’s capacity. A sealed multi-layer filtration system with HEPA filtration is listed, but the supplied details do not specify the number of layers.The main compromise is power-session planning: KARDV lists 20–25 minutes in maximum mode, compared with up to 60 minutes in minimum mode. We should not expect the longest runtime while using its stronger setting. Choose it for lower weight, flexible attachments and the floor light; consider X100 instead if a larger bin and more suction settings matter more.
Pros:
- Lightest listed weight in this comparison at 5 pounds
- Removable battery and wall-mounted charging
- Green LED on the anti-tangle brush helps show debris under furniture
- Eight-in-one accessories support handheld and detail cleaning
Cons:
- Maximum-mode runtime is listed at only 20–25 minutes
- Its 1.5-liter dust cup is smaller than the X100’s
- Only two suction modes are specified
Best for: People who prioritize a lightweight vacuum for mixed floors and above-floor cleaning, especially when a removable battery is useful.
Not ideal for: Buyers who regularly clean large areas at maximum suction or want the largest dust cup and most detailed status display.
Bottom line: KARDV is the most appealing choice for lighter handling and accessory flexibility, provided we can work within its shorter maximum-mode runtime.
“KARDV is the most appealing choice for lighter handling and accessory flexibility, provided we can work within its shorter maximum-mode runtime.”
Emfatix VC7211 Cordless Stick Vacuum Cleaner
The Emfatix VC7211 keeps the core cordless-stick format straightforward: three speeds, a HEPA filter, an anti-hair-wrap feature and a charging dock are listed, along with a crevice tool for narrow spaces. For buyers who want a basic set of floor and detail-cleaning essentials without the X100’s touch screen or KARDV’s eight-in-one accessory set, that simpler package may be enough.Its stated up to 60 minutes of runtime looks competitive beside KARDV’s low-mode claim, but the provided information does not say which speed or test conditions produce that figure. We should therefore avoid treating it as a guaranteed session length. The biggest practical constraint is the 0.8-liter dust capacity: that is less than KARDV’s 1.5 liters and less than half the X100’s 1.8 liters, so frequent emptying is more likely in a larger home or a pet-heavy space.Emfatix lists a weight of 7.9 pounds, heavier than KARDV and the only weight supplied for this model. Its 75 dB noise figure is also the highest clearly stated sound level in the group, though comparable noise figures are not consistently available for the others. This pick makes sense when a dock and basic attachments suit our routine; choose KARDV for lighter handling or X100 for greater bin capacity and clearer controls.
Pros:
- Charging dock and crevice tool are included
- HEPA filter and anti-hair-wrap feature are listed
- Three speeds offer some adjustment
- Up to 60 minutes of runtime is stated
Cons:
- Smallest dust capacity here at 0.8 liters
- Listed weight of 7.9 pounds is higher than KARDV’s
- Listed noise level is 75 dB
- Runtime conditions are not specified
Best for: Buyers who want a simple cordless vacuum with a charging dock, crevice tool and listed anti-hair-wrap feature.
Not ideal for: People who need a large dust cup, lighter handling, or a runtime figure tied clearly to a specific suction setting.
Bottom line: Emfatix is a straightforward dock-based option, but its small bin and unclear runtime conditions make it a less versatile pick than KARDV or X100.
“Emfatix is a straightforward dock-based option, but its small bin and unclear runtime conditions make it a less versatile pick than KARDV or X100.”
As an Amazon Associate we earn from qualifying purchases.
Before You Start
Compare models by the floor types they support, usable runtime, bin capacity, weight, included tools, and replacement filter and battery availability. Runtime varies with suction mode and attachments; a high-power mode can use the battery much faster than a low-power mode. If you have several floors or a large home, check whether the stated runtime is enough for your typical cleaning session.
Unplug the charger before cleaning or inspecting the vacuum. Never reach into the brush roll while the vacuum is powered on. Let washed parts dry fully before reinstalling them, and keep the motor and electrical contacts away from water.
Step-by-Step Instructions
Step 1: Match the vacuum to your home
List the surfaces you clean, such as carpet, hard flooring, stairs, upholstery, and car interiors. Compare that list with each model’s floor-head design and included attachments. Check the vacuum’s weight, bin size, battery runtime, and whether its battery or filters can be replaced. Choose a model with a suitable head for your main floor type and tools for the places you clean often.
Tip:Pet hair, long hair, and thick carpet can increase brush-roll tangles and battery use. Check the manual or product details for guidance on those conditions.
Check: Your chosen vacuum supports the surfaces you clean and includes, or can use, the attachments you need.
Step 2: Assemble and inspect the vacuum
Lay out the motor unit, wand, floor head, charger, and attachments. Follow the manual to connect each part until it locks or seats firmly. Check that the bin is installed, the filter is present, and no packing material remains in the air path or brush head. Mount or place the charging dock as directed, away from heat and areas where it could be knocked over.
Tip:Do not force a connector that will not fit. Check that you have the right part and its correct orientation.
Check: The wand and floor head stay connected during handling, and the bin and filter are in place.
Step 3: Charge the battery fully
Connect the charger to the vacuum or dock as the manual directs, then plug it into a suitable outlet. Read the indicator light or display to confirm that charging has started. Leave the vacuum charging for the time listed by the manufacturer. If the manual calls for a first full charge, complete it before cleaning.
Tip:Use the supplied or manufacturer-approved charger. A charging symbol or completed-charge indicator can differ between models.
Check: The charging indicator shows a full charge or the manual’s stated completion signal.
Step 4: Prepare the room and select an attachment
Pick up large objects, loose cords, and items that could block the floor head. Move light rugs if the manufacturer advises against vacuuming them with the powered head. Fit the floor head for open floors; use a crevice tool for edges and narrow gaps, and an upholstery tool for suitable fabric. Check each attachment’s intended use in the manual.
Tip:Do not vacuum liquids, hot ash, or sharp debris unless the manual explicitly permits it. These can damage the vacuum or create a hazard.
Check: The cleaning path is clear, and the fitted head is suitable for the surface ahead.
Step 5: Vacuum in short, steady passes
Turn the vacuum on and start in the lowest mode that picks up debris effectively. Move the floor head slowly in overlapping passes so the brush has time to collect dirt. Use the boost mode for limited areas that need more suction, then return to a lower mode to conserve battery. Pause if the head stops turning or the airflow drops.
Tip:On rugs, check that the head moves smoothly and does not pull or stall the fabric. Change the setting or head if needed.
Check: Loose debris is collected, the head moves without repeated stalls, and the battery indicator remains active.
Step 6: Empty the bin when needed
Switch off the vacuum and hold the bin over a waste container. Release its latch as the manual shows, keeping your fingers clear of the opening. Empty the contents, close the bin firmly, and reinstall it. Avoid filling past the marked maximum line because an overfilled bin can reduce airflow.
Tip:If dust escapes easily, empty the bin outdoors or into a lined container and avoid shaking it near your face.
Check: The bin is below its fill limit, latched shut, and seated in the vacuum.
Step 7: Clean the filter and brush roll
Switch off and disconnect the charger before maintenance. Remove the filter and brush roll only as the manual describes. Tap dust from a non-washable filter over a bin; wash only filters marked washable, using the method specified by the manufacturer. Cut wrapped hair from the brush roll carefully, keeping blades away from the bristles and belt. Refit parts only when they are fully dry and correctly seated.
Tip:A damp filter can damage the motor or cause a musty smell. Drying may take a full day or longer; follow the manual’s timing.
Check: The brush roll turns freely by hand when the vacuum is off, and all cleaned parts are dry and secure.
Step 8: Store the vacuum for its next use
Attach the vacuum to its dock or place it in the storage position specified by the manufacturer. Keep it away from wet areas and heat sources. Charge it according to the manual; if you will store it for a long period, follow the battery storage instructions. Keep small attachments together so they are ready for the next cleaning session.
Tip:Do not store the vacuum with a full bin or a tangled brush roll. Those conditions can make the next session less effective.
Check: The vacuum is stable in its storage location, its bin is empty, and its battery is charging or stored as directed.
Common Mistakes to Avoid
- Using boost mode for the entire cleaning session drains the battery quickly. — Start with a lower setting and reserve boost for stubborn dirt or small areas.
- Washing a filter that is not washable, or reinstalling one before it is dry. — Check the manual’s filter instructions and let washable parts dry completely before refitting.
- Allowing the bin to fill past its maximum mark. — Check the bin during cleaning and empty it before it reaches the line.
- Pulling hair from a powered or connected brush roll. — Switch the vacuum off, disconnect it from charging, and remove the brush roll as directed before cutting away hair.
Troubleshooting
Problem: The vacuum has weak suction or leaves debris behind.
Solution: Switch it off. Empty the bin, inspect the floor head and air path for blockages, and check that the filter is clean and seated correctly. Reinstall only dry parts, then try again.
Problem: The brush roll stops or the floor head stalls.
Solution: Turn the vacuum off and check the brush roll for hair, string, or a trapped object. Remove the obstruction as the manual directs. Confirm that the head is suitable for the floor and that its parts are fitted correctly.
Problem: The battery runs out before cleaning is finished.
Solution: Charge it fully, use a lower suction mode where effective, and check whether a powered tool or thick carpet increases battery use. For a large home, divide cleaning into sessions or check whether the model supports a replacement battery.
Problem: The vacuum does not charge.
Solution: Check that the outlet works, the charger is connected at both ends, and the vacuum is seated correctly on its dock. Inspect for visible damage and consult the manual’s indicator-light guide. Stop using a damaged charger and contact the manufacturer.
What Success Looks Like
The vacuum collects debris from the intended surfaces without repeated loss of suction or brush-roll stalls. Its bin closes and fits securely, the filter and brush roll are clean and correctly installed, and the battery charges according to the model’s indicator. A clean filter and open air path should also leave airflow steady during use.
Next Steps
After each session, empty the bin if debris is near its fill line and remove visible hair from the brush roll. Check the filter at the interval in the manual, since dust and pet hair can shorten that interval. Replace filters, batteries, or brush parts with compatible parts when cleaning no longer restores performance. Contact the manufacturer if the vacuum overheats, makes an unusual noise, or still loses suction after you clear blockages and clean its parts.
Frequently Asked Questions
How often should I empty a cordless stick vacuum?
Empty it when debris approaches the bin’s maximum line, or sooner if suction drops. Homes with pets or heavy dust may need more frequent emptying.
Can I use a cordless stick vacuum on every floor?
Only use a floor head and setting the manufacturer approves for that surface. Some powered heads work on carpet and hard floors, while other models need a different head or setting to avoid scattering debris or catching rugs.
How long does a cordless stick vacuum run on one charge?
Runtime depends on the model, battery condition, suction setting, and attachment. Check the manufacturer’s figures for the mode and tool you plan to use; boost mode generally uses more power.
Can I vacuum up water with a cordless stick vacuum?
No, unless the manual specifically identifies the model as suitable for wet pickup. Water can damage a dry vacuum’s motor and electrical components.
Why does my vacuum smell after cleaning?
Turn it off and check for a full bin, dirty filter, or trapped debris in the head. Clean parts as the manual allows and let washed filters dry fully. If the smell persists or seems like burning, stop using the vacuum and contact the manufacturer.