TL;DR
Your best soundproofing starts with distance, not foam. Moving your rig into a closet with proper ventilation and strategic treatment drastically cuts noise. Foam absorbs reflections but won’t block sound transmission—cover the basics first.
Ever tried to quiet down a noisy AI workstation? Most folks reach for foam panels first. But here’s the truth: the biggest noise reduction comes from just moving the machine out of your way. A rig in another room, or even a closet, can be whisper-quiet—without a single piece of foam.
This guide is about how to make that happen. You can learn more about acoustic treatment and setup here. You’ll learn where to place your gear, how to treat the space for sound, and the one critical thing most overlook—ventilation. After all, a quiet closet rig is only good if it stays cool.
Acoustic dampening
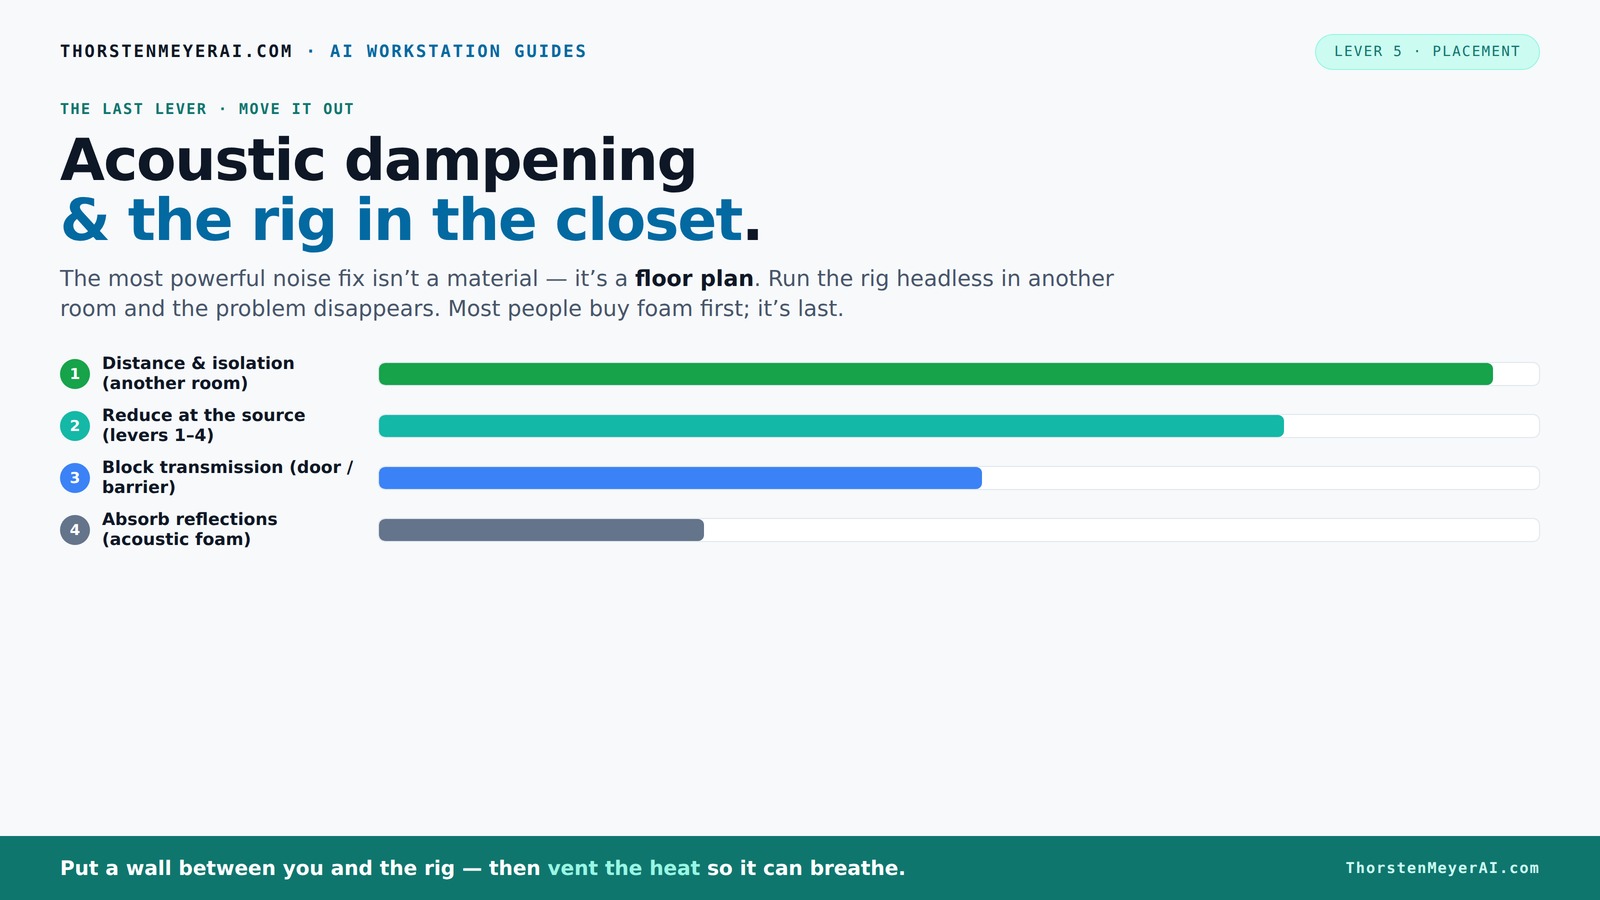
& the rig in the closet.
The most powerful noise fix isn’t a material — it’s a floor plan. A rig you can’t hear because it’s in another room beats any amount of foam. Tap the approaches in Part 1 to see what actually works.
(another room)
(levers 1–4)
(door / barrier)
(acoustic foam)
Contain the noise, not the heat
Key Takeaways
- Distance is the most effective noise reduction method—consider placing your rig in another room or closet.
- Ventilation is critical—seal the space properly but ensure airflow to prevent overheating.
- Acoustic dampening reduces echo, but soundproofing blocks outside noise; both are needed for best results.
- DIY solutions like blankets or rugs can dramatically improve sound quality at minimal cost.
- Proper mic placement and treatment placement make a huge difference in sound clarity.
soundproof closet for computer
As an affiliate, we earn on qualifying purchases.
As an affiliate, we earn on qualifying purchases.
Why Distance Is Your Best Noise Killer
Distance is the simplest, cheapest, most effective way to cut noise. Move your rig into another room or a closet, and the sound pressure drops dramatically. Think of it like this: the farther the sound source is from you, the less intense it feels, and the more it diminishes before reaching your ears.
Imagine a GPU fan roaring at 80dB; if you place that in a different room, the sound doesn't just get quieter—it becomes less perceptible because of the inverse square law. This means the sound intensity decreases proportional to the square of the distance from the source. So, doubling the distance can reduce perceived loudness by about 6dB, which is significant.
In practical terms, placing your AI workstation in a basement or closet can reduce noise levels by 15-20dB, often making it almost inaudible from your primary workspace. This isn’t just about comfort; it also prevents noise pollution and distraction. The tradeoff, of course, is potential latency issues if your network isn’t robust, so a wired connection is recommended for optimal performance.
quiet AI workstation enclosure
As an affiliate, we earn on qualifying purchases.
As an affiliate, we earn on qualifying purchases.
The 'Rig in the Closet' Setup — The Good, the Bad, and the Heat
Placing your rig inside a closet can drastically reduce noise, turning a noisy machine into a near-silent component of your workspace. It’s an inexpensive and straightforward solution that leverages existing structures. However, heat management is the critical challenge—sealed spaces trap hot air, which can cause components to overheat, throttling performance or risking damage.
To succeed, you need to implement effective ventilation—think of it as giving your closet a set of lungs. Installing vents, fans, or ducting allows hot air to escape and fresh air to circulate, preventing heat buildup without sacrificing noise reduction. For more tips, see this guide on room setup. For example, a small exhaust fan with a duct running outside can pull hot air out quietly, maintaining a stable temperature. Similarly, intake vents or passive airflow can draw cooler air in, creating a gentle circulation loop.
This setup requires balancing noise control with thermal management. A well-designed vent system ensures your rig remains cool and quiet, similar to how a custom soundproof cabinet uses ventilation to prevent overheating while blocking external noise. The tradeoff is increased complexity and initial setup effort, but the payoff is a clean, quiet, and safe environment for your hardware.
acoustic treatment for server room
As an affiliate, we earn on qualifying purchases.
As an affiliate, we earn on qualifying purchases.
Acoustic Treatment 101: Dampening vs. Soundproofing
Understanding the difference is crucial. For detailed techniques, visit this resource on acoustic treatment. Acoustic dampening reduces echoes and internal reflections within a space, which can cause recordings to sound muddy or reverb-heavy. Soundproofing, on the other hand, involves adding mass and sealing gaps to prevent sound from escaping or entering, which is essential for blocking external noise sources like street noise or HVAC hum.
In a closet, dampening materials like foam panels or blankets help absorb sound waves, preventing them from bouncing around and creating reverb. This results in clearer recordings and reduces internal echo. However, these materials do little to block external noise transmission because they don’t add mass or create a sealed barrier.
Soundproofing techniques—such as sealing gaps, adding mass to walls, or using specialized soundproofing materials—are more complex and often more expensive. They prevent outside noise from entering and internal sound from escaping, which is vital if you work in noisy environments. The tradeoff is that effective soundproofing can be labor-intensive and may require structural modifications. Combining dampening inside the closet with soundproofing measures at the door or walls gives you the best overall isolation, but you should weigh the effort and cost against your noise reduction goals.
ventilated computer closet
As an affiliate, we earn on qualifying purchases.
As an affiliate, we earn on qualifying purchases.
Where to Place Acoustic Treatment for the Best Results
Placement is everything when it comes to acoustic treatment. Check out this article on proper placement for best results. In small, confined spaces like closets, the goal is to minimize reflections that bounce directly into your microphone, which can cause echo, reverb, and coloration of your sound. Proper placement involves treating the surfaces that are most likely to reflect sound directly into your mic path.
Typically, this means focusing on the wall behind the mic, the side walls, and the ceiling. These surfaces are the primary culprits in creating internal echoes. Installing foam panels or diffusers on these surfaces absorbs or scatters sound waves before they reach your microphone. Additionally, placing a bass trap or foam in the corners can help control low-frequency buildup, which tends to resonate and cause muddiness in recordings.
Positioning your mic about 6-12 inches away from treated surfaces helps prevent phase issues like comb-filtering, which can cause a hollow or unnatural sound. This distance allows direct sound to dominate while reducing the influence of room reflections. Strategic placement of acoustic treatment maximizes its effectiveness, especially in small spaces where reflections are more prominent and can quickly degrade sound quality.
DIY Solutions That Actually Work in Small Spaces
When budget is tight, DIY solutions can be surprisingly effective. For more DIY ideas, see home improvement tips on creating a quiet space. Heavy blankets, thick curtains, and leftover quilts are excellent at absorbing sound reflections and reducing echo. Hanging these materials over walls, doors, or even from the ceiling creates a makeshift acoustic treatment that can significantly improve sound clarity.
For example, a YouTuber layered heavy blankets over the closet door, on the walls, and under the ceiling. This multi-layered approach reduced internal reflections and improved overall sound quality markedly. The key is to cover as many reflective surfaces as possible without obstructing ventilation or access. Adding a thick area rug on the floor can help absorb bouncing sounds from below and tame low frequencies. For bass issues, placing foam bass traps in the corners helps control low-end resonance, preventing muddiness and standing waves common in small spaces. DIY solutions are cost-effective, customizable, and can be highly effective if thoughtfully implemented.
Handling the Closet Door and Other Gaps
The door gap is often the weakest link in a closet setup. Sealing cracks with weatherstripping or acoustic sealant is essential to prevent outside noise from sneaking in and to reduce internal echoes. Small gaps can significantly undermine your efforts at isolation, letting in street noise, HVAC hum, or other external sounds.
Applying weatherstripping around the door frame creates a tighter seal, reducing sound transmission by 10-15dB. Filling cracks or holes with acoustic caulk further enhances this effect. Covering the door with a thick blanket or an acoustic panel adds an extra layer of sound absorption and prevents reflections. Be mindful that overly tight seals may restrict airflow, so balance soundproofing with ventilation needs. Proper sealing improves both internal acoustics and external noise rejection, making your closet rig more effective and quieter overall.
Optimizing Mic Placement in a Small, Treated Space
Mic placement is critical to capturing the best sound quality. Position your microphone about 6-12 inches from the sound source, aiming directly at it. In a small, treated closet, placing the mic centrally helps minimize the influence of room reflections and standing waves, which can color your recordings with unwanted resonance.
Using a shock mount and a pop filter reduces mechanical noise and plosive sounds, respectively. Experiment with different angles and distances—closer mic placement generally yields a more direct, intimate sound with less room ambience, but too close can cause proximity effect, boosting bass frequencies unnaturally. The key is to find a position where your voice or instrument sounds natural, clear, and free from room coloration. Combining smart mic placement with proper acoustic treatment ensures professional-sounding recordings in even the smallest spaces.
Power, Cables, and Ventilation: Making the Closet Usable Long-Term
Power and cable management are essential to maintaining a safe, organized workspace. Using surge protectors and cable sleeves keeps cords tidy, reduces tripping hazards, and prevents accidental disconnections. Keep cables away from vents and airflow pathways to avoid obstructing cooling mechanisms.
Ventilation is non-negotiable. An effective setup requires a quiet exhaust fan, ducting, or an active ventilation system that circulates air without introducing noise. Proper airflow prevents heat buildup, which can throttle your hardware’s performance or cause overheating. For example, a 120mm fan pulling hot air out through a duct vent kept temperatures stable in a small closet setup, allowing hours of continuous operation without thermal throttling. Adequate ventilation ensures your hardware stays cool, performs optimally, and remains silent during extended sessions. Neglecting this can cause thermal issues that lead to increased noise from fans working harder or hardware shutdowns, defeating the purpose of a quiet setup.
Frequently Asked Questions
Is a closet really better than an open room for a noisy rig?
Yes. Moving your rig into a closet or another room reduces direct sound transmission and echoes. It’s often the simplest way to make your workspace quieter without expensive treatments.What’s the difference between acoustic dampening and soundproofing?
Dampening reduces reflections and echoes inside a space, making recordings cleaner. Soundproofing blocks sound from escaping or entering, preventing noise leakage—think sealing gaps and adding mass.Where should I place acoustic panels in a small closet studio?
Focus on the wall behind the mic, the side walls, and the ceiling. These areas are where reflections bounce toward your mic. Placing panels strategically reduces echo and improves clarity.Do I need bass traps in a small closet?
If you notice low-frequency buildup or standing waves, bass traps in the corners can help. They’re especially useful if your recordings sound boomy or muddy.How can I keep my closet rig cool without noise?
Use a quiet exhaust fan, ducting, or an active ventilation system. Proper airflow prevents heat from trapping inside, keeping your hardware safe and quiet during long sessions.Conclusion
Turning a closet into a quiet, efficient rig space isn’t complicated—just smart placement, good ventilation, and targeted treatment. The real secret? Distance beats foam every time. If noise is a problem, move your rig away from your workspace, seal the gaps, and give it proper airflow. You’ll gain silence, safety, and better performance all at once.
Next time you think about adding more foam, remember: the best noise control comes from where you put your gear and how you treat the space around it.