
To clean your vacuum inside and out for peak performance, start by unplugging it and emptying the dustbin or replacing the bag before checking filters and replacing if needed. Clean the brush roll, remove hair and debris, and wipe down exterior surfaces with a damp cloth. Clear blockages from hoses and attachments, and inspect internal parts for wear. Regular maintenance keeps your vacuum running smoothly—keep going to discover detailed tips for long-lasting cleaning power.
Key Takeaways
- Unplug the vacuum and clean or replace filters, dustbin, and bag regularly to maintain optimal airflow and suction.
- Inspect and clear blockages in hoses, nozzles, and airflow pathways to prevent loss of power.
- Detangle hair, string, and debris from the brush roll and beater bar to ensure effective cleaning.
- Wipe down exterior surfaces and vents with a damp cloth to remove dust and grime.
- Schedule routine internal inspections and maintenance, including filter cleaning and parts replacement, for peak performance.

keluke Vacuum Filter Replacement Kit Compatible with Dyson V7, V8 Animal, V8 Absolute & SV10 Cordless Vacuum Cleaners, Replaces Part # 965661-01 & 967478-01 (4P)
PRECISE FIT – Specifically crafted compatible with dysonV7 Animal, V7, SV10, and V8 Absolute Vacuums. The post filter…
As an affiliate, we earn on qualifying purchases.
As an affiliate, we earn on qualifying purchases.
Unplugging and Preparing Your Vacuum for Cleaning

Have you unplugged your vacuum yet? Before you start cleaning, always unplug it to guarantee safety. Taking a moment to prepare your vacuum correctly can improve vacuum ergonomics, making the process easier and more comfortable. Adjust the handle and wand to a comfortable height, reducing strain on your back and arms. Consider noise reduction techniques, like working in a different room or using soft cloths around the vacuum to muffle sound, especially if you’re sensitive to noise. These steps make cleaning less stressful and more efficient. Once unplugged, check for any obvious blockages or loose parts, setting the stage for a thorough cleaning. Proper vacuum maintenance helps your appliance perform better and lasts longer. Additionally, understanding sound healing science can inspire you to incorporate calming practices during your cleaning routine to enhance relaxation. Being aware of maintenance costs can also motivate you to keep your vacuum in good condition to avoid costly repairs later. Regularly inspecting and cleaning filters can also help prevent buildup and improve suction efficiency, which is an essential aspect of vacuum longevity. For optimal performance, consider cleaning the dustbin or bag frequently to prevent clogs and maintain strong suction.

Tweruna 4 PCS Handheld Vacuum Cleaner Brush, Universal Dust Brush, 2 in 1 Vacuum Roller Cleaning Tool for Sweeping Robot
Package Includes: You will receive 4 pcs handheld vacuum cleaner brushes in 2 different styles, perfect for universal…
As an affiliate, we earn on qualifying purchases.
As an affiliate, we earn on qualifying purchases.
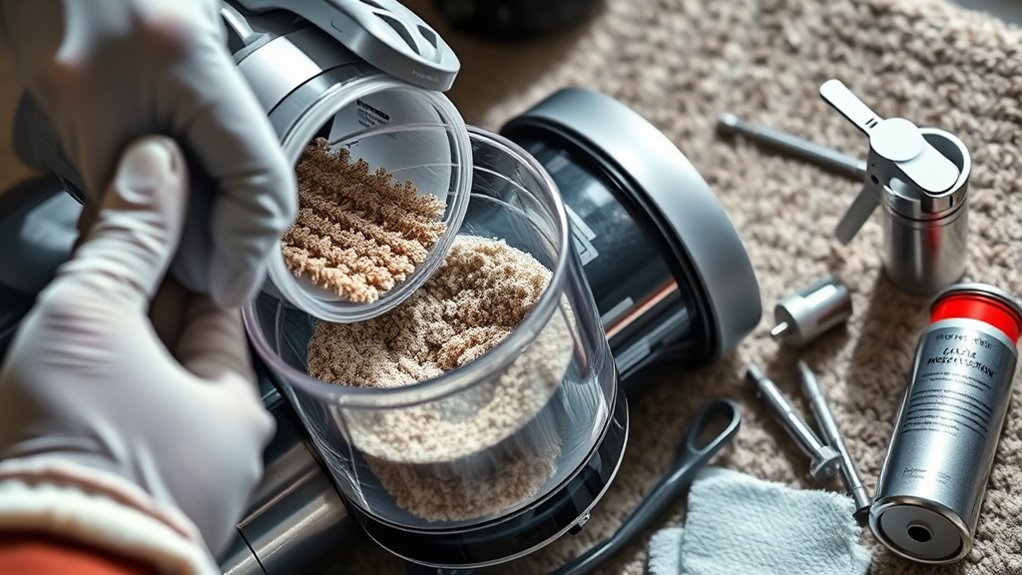
Clearing Out the Dustbin or Bag

Before you start cleaning your vacuum, it’s essential to empty the dustbin or replace the bag. Proper dustbin maintenance guarantees peak suction and prevents clogs. Check if your dustbin is full; if it is, empty it carefully into the trash. For bagged vacuums, replace the bag when it’s about 75% full to maintain best performance. Regular maintenance prevents dust buildup that can hinder airflow. Use the table below to understand different dustbin and bag replacement tips:
| Tip | Explanation |
|---|---|
| Check frequently | Inspect dustbin/bag after each use |
| Avoid overfilling | Prevent loss of suction and motor strain |
| Use correct bags | Ensure compatibility for effective dust containment |
| Clean dustbin regularly | Remove dust and debris for better airflow |
| Replace when full | Follow manufacturer’s guidelines for timing |
A well-maintained vacuum helps ensure optimal cleaning and longer-lasting performance. Additionally, paying attention to the filtration system, such as HEPA filters, can improve indoor air quality and prevent allergens from recirculating. Regularly inspecting components like the motor can also help prevent overheating and ensure consistent power. Ensuring that the brush roll is free from hair and debris can further enhance cleaning efficiency. Properly tuning and maintaining internal components, similar to Kia Tuning, can optimize overall performance and extend the lifespan of your vacuum.

Sealegend Dryer Vent Cleaner Kit Vacuum Hose Attachment Compatible with Most Vacuum Cleaner, Quickly Lint Remover Cleaning Supplies
[FITS MOST VACUUM CLEANERS ] Sealegend dryer vent vacuum attachment features a premium universal connector design, compatible with…
As an affiliate, we earn on qualifying purchases.
As an affiliate, we earn on qualifying purchases.
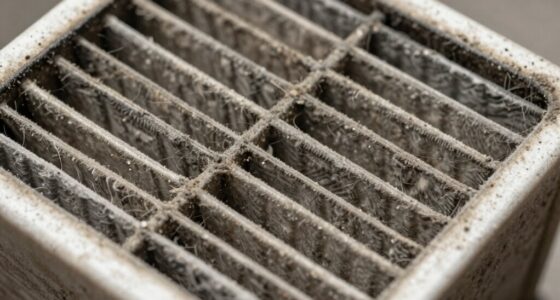
Checking and Replacing Filters for Optimal Airflow
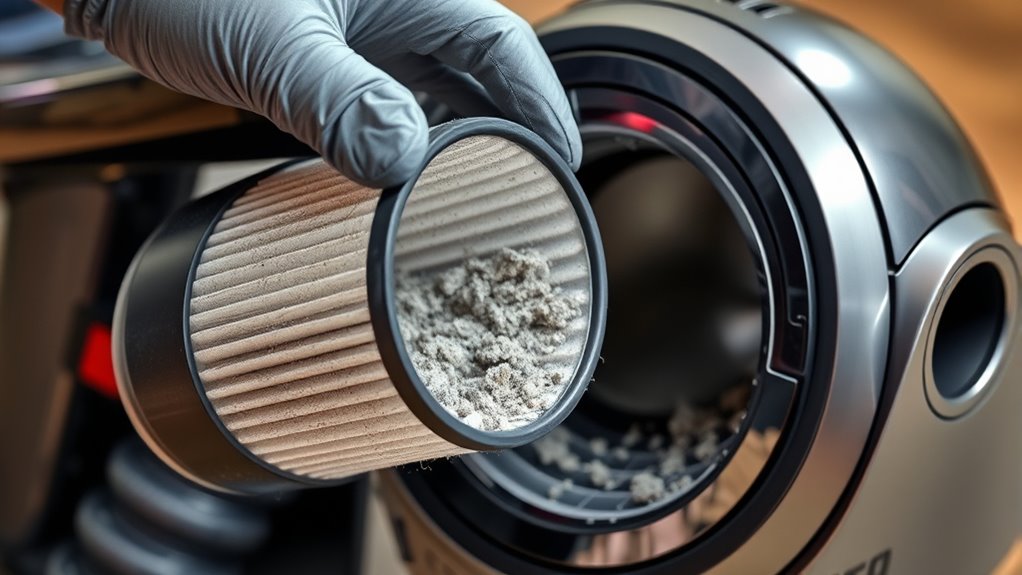
First, identify what type of filter your vacuum uses so you can check it properly. Then, inspect the filter for any blockages or dirt buildup that could hinder airflow. Remember to replace the filter regularly to keep your vacuum running efficiently and maintain good air quality. Additionally, consider the filter’s lifespan and replace it according to the manufacturer’s recommendations for optimal air purification. Regularly cleaning or replacing filters can also help prevent filter clogging and contamination, which can reduce overall system effectiveness.
Identify Filter Types
To guarantee your vacuum operates efficiently, it’s essential to identify the types of filters it uses. Different models feature various filter types, such as HEPA, foam, or cartridge filters. Knowing your filter type helps you perform proper filter maintenance and determine when a filter replacement is necessary. Regularly checking and replacing filters can also improve the overall air quality in your home. Understanding AI safety measures can help you select filters that better capture airborne particles, especially if you have allergies or respiratory sensitivities. Additionally, being aware of Bitcoin IRA considerations can inform your investment decisions, highlighting the importance of regular review and maintenance to optimize performance. Recognizing the significance of dog breeds can also inspire you to choose the right pet for your lifestyle, ensuring a harmonious living environment. Moreover, incorporating noise reduction technology in vacuum cleaners can further enhance your home’s comfort by minimizing operational sound during use.
Inspect for Blockages
Have you noticed your vacuum losing suction or struggling to pick up debris? That’s often due to airflow obstruction caused by debris buildup or clogs in the filters or hoses. Start by inspecting the filters—check for dirt, hair, or other particles that may have accumulated. Clear any visible debris and ensure filters are properly seated. Look inside the hose and around the airflow pathways for blockages that could restrict airflow. Removing obstructions restores ideal suction and cleaning power. Regularly inspecting for blockages helps prevent strain on the motor and keeps your vacuum performing at its best. If you find persistent debris buildup despite cleaning, it might be time to consider replacing filters for continued peak performance. Staying vigilant ensures your vacuum remains efficient and effective.
Replace Regularly
Regularly checking and replacing your vacuum’s filters keeps airflow unobstructed and maintains peak performance. Over time, filters trap dirt, dust, and allergens, but they can become clogged or worn out. Performing regular vacuum filter replacement ensures your vacuum runs efficiently and prolongs its lifespan. Be sure to follow the manufacturer’s guidelines for filter replacement intervals. When replacing filters, also review your dustbin disposal techniques—empty the dustbin regularly and properly to prevent dust buildup and maintain suction power. Proper disposal prevents dust from recirculating into the air and keeps your vacuum functioning at its best. Keeping filters clean and replaced, combined with correct dustbin disposal, guarantees your vacuum maintains strong airflow and performs at its finest.

Anewise 3 Packs 86889 HEPA Media Filter Replacement for Kenmore EF-1, 86889, 20-86889, 40324, 53295 Canister and Upright Vacuum Cleaner, for Panasonic Part MC-V199H
COMPATIBILITY: These HEPA media filter replacement kit are compatible with Kenmore Canister and Upright Vacuum Cleaner #86889, 20-86889,…
As an affiliate, we earn on qualifying purchases.
As an affiliate, we earn on qualifying purchases.
Inspecting and Cleaning the Brush Roll and Beater Bar
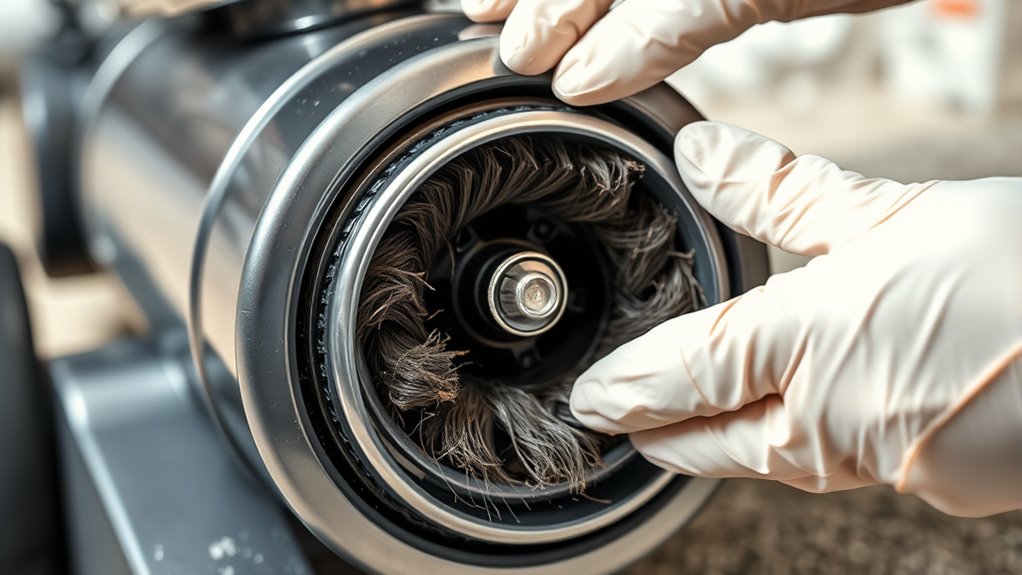
Start by removing any hair and debris tangled around the brush roll and beater bar to keep your vacuum running smoothly. Check for signs of damage or wear that could affect cleaning performance. Taking these steps guarantees your vacuum stays effective and lasts longer.
Remove Hair and Debris
Since hair and debris often get tangled around the brush roll and beater bar during vacuuming, it’s important to inspect these parts regularly. Remove pet hair buildup and embedded debris to guarantee maximum performance. Use scissors or a brush to carefully cut away tangled hair and fibers, preventing clogs and motor strain. Focus on extracting carpet fibers that may have wrapped around the roller, which can hinder cleaning power. After detangling, wipe the brush and beater bar with a damp cloth to remove dust and residue. Doing this frequently keeps your vacuum running smoothly and prolongs its lifespan. Regular maintenance like this ensures your vacuum maintains peak performance, especially when dealing with pet hair and stubborn debris embedded in carpets.
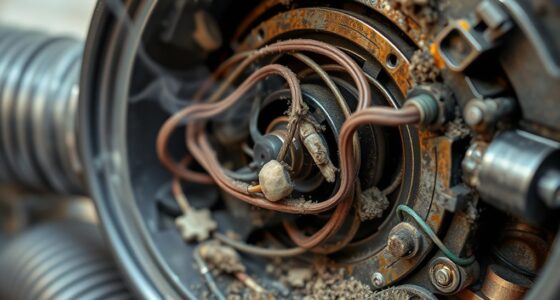
Check for Damage
Inspecting your vacuum’s brush roll and beater bar for damage is essential to maintaining ideal cleaning performance. Look for cracks, loose parts, or worn bristles that can hinder cleaning or cause strain on the vacuum motor. Damaged components might also affect electrical wiring connections, risking motor failure. Use the table below to guide your inspection:
| Damage Type | Signs to Watch For | Action Needed |
|---|---|---|
| Physical damage | Cracks, broken parts | Replace or repair immediately |
| Worn bristles | Excessively frayed or missing bristles | Clean or replace brush roll |
| Electrical issues | Unusual noises, motor strain | Check wiring connections, repair |
Regularly inspecting these parts ensures your vacuum runs smoothly and prevents costly repairs down the line.
Removing Hair, Threads, and Debris From the Brush Roll

Have you noticed your vacuum’s brush roll isn’t spinning as freely as it should? Pet hair, threads, and debris can cause clogs and reduce cleaning power. To fix this, follow these steps:
- Turn off and unplug your vacuum before inspecting the brush roll.
- Remove hair and threads using your fingers or a pair of scissors with caution.
- Use a brush or comb to loosen stubborn debris and pet hair buildup.
- Apply thread extraction techniques by carefully pulling embedded threads out from the brush bristles.
Regular maintenance guarantees effective pet hair removal and keeps the brush roll functioning smoothly. Clearing debris not only improves suction but also prevents damage to the motor, ensuring peak performance every time you vacuum.
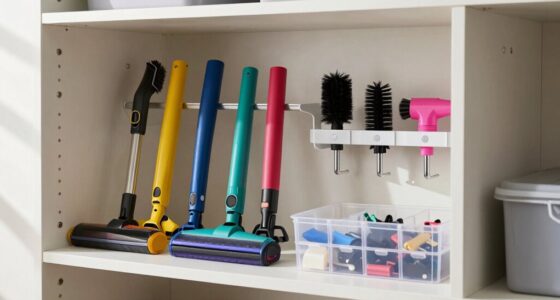
Cleaning the Vacuum Hose and Attachments

To keep your vacuum working efficiently, it’s essential to regularly clean the hose and attachments. Proper hose maintenance involves detaching the hose and inspecting it for blockages or debris that can restrict airflow. Use a long, flexible brush or a broomstick to loosen any trapped dust or dirt inside. For attachment cleaning, wash the tools with warm, soapy water, making sure to remove any hair, lint, or debris clinging to the surfaces. Rinse thoroughly and let them dry completely before reattaching. Regular cleaning of your vacuum hose and attachments ensures maximum suction power and prevents odors or mold buildup. Consistent hose maintenance and attachment cleaning help extend your vacuum’s lifespan and keep it performing at peak levels.
Wiping Down Exterior Surfaces and Controls

After cleaning your vacuum hose and attachments, it’s time to focus on maintaining the exterior surfaces and controls. Proper exterior maintenance keeps your vacuum looking good and ensures smooth operation. Start by unplugging the vacuum. Then, follow these steps:
- Wipe down the entire exterior with a damp cloth to remove dust and debris.
- Use a soft brush or compressed air to clear dirt from vents and crevices.
- Clean the control panel with a microfiber cloth, avoiding excessive moisture.
- Check and wipe down any buttons or switches to ensure they’re free of grime.
This routine helps prevent buildup that could interfere with controls or ventilation. Regular exterior maintenance extends your vacuum’s lifespan and keeps it performing at its best.
Using Appropriate Cleaning Solutions for Different Parts
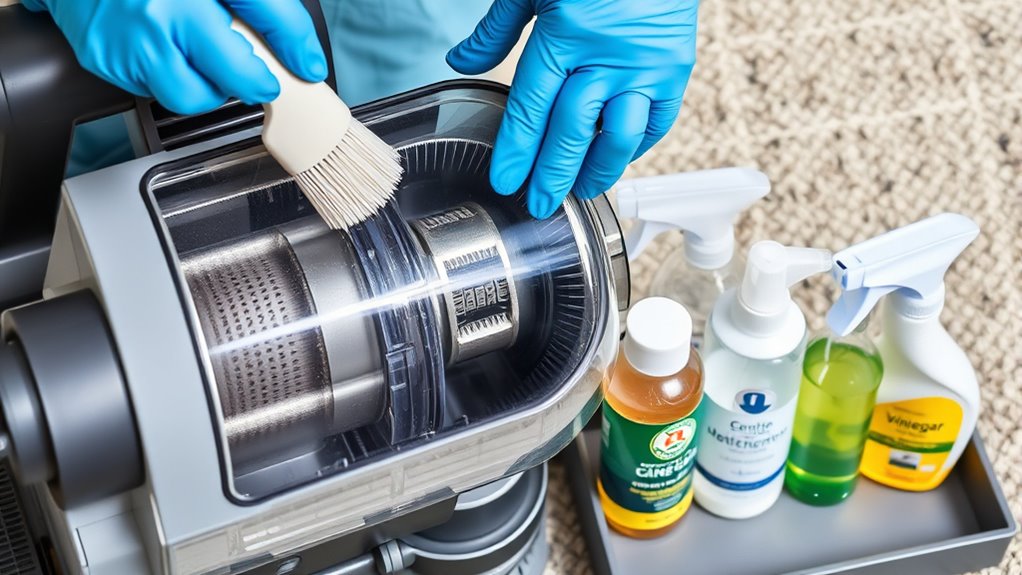
Choosing the right cleaning solutions is vital to prevent damaging your vacuum. You should use suitable cleaning agents for each part, like mild soap for the exterior and specific solutions for filters. Using part-specific solutions guarantees your vacuum stays in top condition and works effectively.
Suitable Cleaning Agents
Selecting the right cleaning agents for your vacuum cleaner is essential to maintain its performance and extend its lifespan. Using appropriate solutions prevents damage and keeps it operating smoothly. For plastic parts, opt for mild soap and water to avoid cracking. When cleaning the brush roll, use a gentle degreaser to remove built-up debris. For areas prone to vacuum odor, consider specialized deodorizing sprays that neutralize smells without harming components. If your vacuum has a cord management system, avoid harsh chemicals that could degrade the material. Finally, always test cleaning agents on a small area first to prevent discoloration or damage. Proper selection of cleaning solutions ensures your vacuum stays efficient, odor-free, and easy to maneuver, especially when managing cords or other sensitive parts.
Part-Specific Solutions
Different parts of your vacuum cleaner require tailored cleaning solutions to keep them functioning properly. For the battery, guarantee proper maintenance by keeping contacts clean and dry, and avoid exposing it to moisture that can cause corrosion. If your vacuum has a rechargeable battery, periodically check for signs of wear or damage and replace it when necessary. For cord management, regularly inspect the cord for frays or kinks, and wipe it down with a damp cloth to remove dirt and dust. Proper storage prevents damage, so avoid wrapping the cord too tightly. Use appropriate cleaning agents for different parts—mild soap for plastic surfaces, and avoid harsh chemicals that could degrade components. By addressing these part-specific needs, you’ll prolong your vacuum’s lifespan and ensure peak performance.
Regular Maintenance Tips to Extend Your Vacuum’s Lifespan

Regular maintenance is essential for keeping your vacuum cleaner running smoothly and prolonging its lifespan. Proper care prevents breakdowns and ensures peak performance. To do this effectively:
- Regularly check and replace filters to improve airflow and suction.
- Keep your vacuum stored in a dry, clean area to prevent damage and make troubleshooting vacuum issues easier.
- Clear brush rollers of hair and debris to maintain effective cleaning.
- Inspect the belt and replace it if you notice signs of wear or slipping.
Performing these simple steps helps prevent clogs and mechanical issues, saving you money in the long run. Staying on top of routine maintenance also makes troubleshooting vacuum problems quicker and less frustrating, guaranteeing your vacuum remains reliable for years to come.
Storing Your Vacuum Properly After Cleaning

After cleaning your vacuum, it’s important to store it properly to keep it in good condition and ready for your next use. Use storage tips like keeping it in a dry, cool place away from direct sunlight to prevent damage. Make sure the cord is neatly wound to avoid tangling, which also saves space and prolongs cord life. If your vacuum has attachments, store them in a designated container or compartment to stay organized. Consider space-saving solutions like wall mounts or hanging racks, which free up floor space and keep your vacuum easily accessible. Proper storage prevents dust accumulation and potential damage, ensuring your vacuum performs at peak efficiency when you need it most.
Frequently Asked Questions
How Often Should I Clean My Vacuum’s Filters?
You should clean your vacuum’s filters regularly to maintain ideal performance. The cleaning frequency depends on usage; typically, check filters every 1-3 months. Replace filters as needed when they show signs of wear or damage. Proper filter maintenance prevents clogs and ensures better suction. By keeping up with filter replacement and cleaning, you help your vacuum run smoothly and extend its lifespan.
Can I Use Water to Clean the Vacuum’s Interior Parts?
You might wonder if you can use water to clean your vacuum’s interior parts. It’s best to avoid water damage by not immersing electrical components. Instead, use a damp cloth or gentle cleaning solutions for non-electrical parts. Water can cause corrosion or damage, so always make certain parts are thoroughly dried before reassembling. Proper cleaning maintains your vacuum’s performance and prevents issues caused by moisture or residue buildup.
What Signs Indicate My Vacuum Needs Professional Repairs?
If your vacuum isn’t performing well, signs like strange noises, a burning smell, or reduced suction indicate you might need professional repairs. Check the vacuum motor for overheating or unusual sounds, and guarantee the brush roller maintenance is up to date—clogs or tangled hair can hinder performance. Addressing these issues promptly keeps your vacuum running smoothly, preventing further damage and extending its lifespan.
How Do I Prevent Static Buildup During Cleaning?
To prevent static buildup during cleaning, you should minimize static electricity by using anti-static sprays on your vacuum’s brushes and hoses. Wearing natural fiber clothing also helps reduce static. Keep humidity levels moderate, as dry air increases static. Regularly clean or replace filters and check for any loose parts. These steps reduce static electricity, making your vacuuming safer and more effective, and help prevent static shocks or damage to sensitive surfaces.
Are There Specific Cleaning Products Recommended for Delicate Vacuum Components?
When cleaning delicate vacuum components, avoid harsh chemicals that could damage your vacuum accessories. Instead, use a soft cloth dampened with mild soap or a manufacturer-recommended cleaner. Incorporate these into your regular cleaning schedule to maintain peak performance. Always check your vacuum’s manual for specific product recommendations, ensuring you protect sensitive parts while keeping your vacuum in top shape. This approach helps prolong your vacuum’s lifespan and efficiency.
Conclusion
Now that you’ve given your vacuum a thorough spa day, it’s ready to conquer dirt like a champion. Think of your cleaner as a trusty steed, enthusiastic to perform at its peak whenever you need it. With regular upkeep, you’ll keep it running smoothly, turning your cleaning routine into a breeze. So, treat your vacuum well, and it’ll reward you with spotless floors and a long, happy life—your home’s shining armor.